Friday 26 July 2013

Upgraded Carpet

Thanks to commenter, Sam, who suggested we ask at final contract signing about the cost of upgrading the carpet. We did so, and were told that to upgrade from 'Impressions' to 'Superior' (I think) was about $500 and to go up to 'Designer' was about $1000. This is for approximately 100m2 of carpeted areas in the Drysdale 30.

HOWEVER, Porter Davis being Porter Davis - what one staff member says is soon contradicted by another staff member. We raced back to Hopetoun Interiors to choose a different, better quality carpet. But we were immediately told that the Impressions, Superior and Designer ranges no longer exist! At Hopetoun, of course, they could not provide us with any quotes. Their carpet choices are separated into 5 or 6 categories, so we figured we were safe if we upgraded to a Category 2. Side note - we spent about 2 hours just staring at carpet, unable to decide between about 3 similar choices!! Very frustrating!

We were shocked, then, to find that when we emailed our new choice to our Building Coordinator asking for a quote for the upgrade, to be told that it would cost over $2000! That was just for Category 2. Fortunately for us (but not necessarily for anyone else reading this), they said they would offer the upgrade to us based on the incorrect 'quote' we were given based on the now non-existent Superior range when we were at final contract signing.

SO... Lesson for you building with Porter Davis or thinking about it - Upgrading your carpet through PD probably WILL be expensive! See a previous blog post where we compared a quote we had from a flooring store to the PD flooring package. As an updated summary:

  • The flooring package through PD is NOW about $8,200. This provides Bolero laminate flooring and category 1 carpet;
  • To upgrade 100m2 of carpet through PD is NOW about $2000, which would take the total to $10,200.
  • To upgrade from laminate to Timbertop floorboards is a significant cost - sorry I can't be more specific.
  • To get 100m2 of vinyl floor planks which were beautiful, including with decorative edgings AND 100m2 of fairly 'cushy' carpet AND very fat underlay, through a flooring store was going to cost about $12,000.
Conclusion? If you want decent carpets and floors and have a little more money to spend, you're probably best NOT using PD but getting your floors after the build.

Fortunately for us it did work out pretty well. So thanks again, Sam.

Wednesday 10 July 2013

More on Flooring

Suzy just posted about our external colour choices as well as our choice of flooring. I thought I'd give a bit more info about the flooring, as it was an area we spent a fair bit of time looking into.

Our Flooring Choice
We chose the flooring pack ($7199) and with it got to chose from Bolero timber look floor boards (so laminate) and carpet. We were wanting a light and bright house so chose the following:

Bolero 'Rustic Nougat' Laminate flooring and
Category 1 Godfrey Hirst carpet (can't recall the colour name)
At first we thought we could do better than the standard laminate flooring Porter Davis includes in the flooring pack. A friend of ours insisted vinyl plank flooring was really good (he's biased, he lays it for a living). At first we laughed him off, but eventually we went and looked at some vinyl planking and LOVED it! It is NOT at all like the older vinyl sheeting you imagine in 70s kitchens and bathrooms. They can have lovely textures and look like real wood.

Unfortunately, we got a couple of quotes to do the house in vinyl planking and pretty decent carpet and they came in at around $12,000 for the house (100m of vinyl planking, 100m of carpet). We felt this was too much over the Porter Davis floor package price. However, we still didn't like the sound of laminate either, so we were a bit torn.

But then we spoke to a helpful guy at the Harvey Norman flooring centre on Greens Road (near Dandenong) gave us some insight into what makes a better quality laminate floor. He told us you need to consider the abrasiveness rating (how easy they scratch) and the thickness of the laminate layer. A good quality laminate floor, he said, should have at least AC3 abrasiveness rating and be 8mm thick. Here are the specs for Bolero:
 Wear Rating AC4
 Structure White HDF
    
 Thickness 8 mm [1/3 in]
 Length 1210 mm [4 ft]
 Width 191 mm [7 1/2 in]
    
 Bevel 2V Colored Bevel
 Surface Real wood feel Brushed
 Installation System Angle Loc

So as you can see, Bolero appears to be pretty decent. We then saw a Bolero laminate at one of the Porter Davis display houses and it looked really good. It was textured and has lines (or grooves) in it, so it's not completely flat and shiny like a lot of laminates (and 'timbertop' floors for that matter).

After that we were very happy to stick with the Porter Davis flooring package, although as Suzy said in her post, it did mean we stuck with just Category 1 carpet instead of really plush feeling carpet.

Colour scheme

So I've finally had a chance to upload our colour scheme. I had a little hissy fit the other night over the colour of our roller door (we originaly chose colourbond 'paperbark'. I then realised how dark this was, it was more like a beige than the cream i was after). We had a look at many photos and websites and Nath was very calm while I was in my flurry over what colour we should have. It was for the roller door, fascia, down pipes, timber work at front of house, infill above garage etc, so a fair bit.

We asked PD after the 48 hours from our Hopetoun Interiors selections and they were still happy to let us change it. So thankful!

SO here they are.... drum roll.....


sorry about the rotation, not sure how to fix this one....
The bricks are Homestead Red Gum
Tiles are... midnight

Guttering- woodland grey, the one right in the middle
Gutter Facsia - Classic Cream
Roller door, infill above roller door, facade posts, rear garage door- this was going to the be the darker 'beige' colour ('paperbark'), but we've changed it to classic cream
Windows- white birch

We are going for the traditional looking house, with the red bricks and creamy tones etc. SO hopefully these colours should do the trick.

INSIDE...
We chose the flooring pack ($7199) and with it got to chose from Bolero timber look floor boards (so laminate) and carpet. We were wanting a light and bright house so chose the following:

our beautiful bolero flooring! it has such a lovely texture to it


AS you can see the floorboards are quite light, they are called rustic nougat. They have a lovely texture to them, so not just flat and shiny like many fake floorings. The bottom swatch on the right hand side of the photo is close to our wall colour, we chose etheral white (slightly creamy). The other swatch is our essa stone bench top. French Nougart. And the carpet is obviously the carpet. We didnt upgrade the carpet and the girl at HI advised us not to as it would be too expensive. We opted to upgrade the underlay though, so we get a softer feel.


Sunday 7 July 2013

Shower and Basins Upgrades

Ensuite Shower
I (Nathan) was very keen at our last house to upgrade our standard shower head to a large (20cm+) one. Preferably, I've wanted the 'rain shower' kind of experience, though I believe to get those properly costs thousands of dollars, so a large shower head would have to do. This time around, Suzy encouraged me to have the shower how I wanted it included in the build. So I did!

Communication from Porter Davis was pretty poor in this area (in regards to bathroom choices in general actually). We got told, variously, from different staff, that 1) we could choose any Tradelink product from our local Tradelink supplier website; or 2) we could choose any shower head we saw at any PD display house; or 3) we would be shown a catalog at our colour appointment and have a range to choose from. However, none of that was true. It turns out that as we are building a Lifestyle range house, we can only chose from Lifestyle range products (they have different suppliers for Access and Prestige range houses) - although I read in another blog on building the Drysdale 30 that they were able to pay extra to upgrade to even Prestige products... who knows? In the end, very disappointingly, it appears we only had ONE choice in this regard (or so that's what our colour appointment staff told us) and they couldn't even show us a picture! Unbelievable! Fortunately, I have now Googled the one we should be getting and I am very happy with it. And here it is:
The Tiber Overhead Rain Shower, 250mm, by Dorf
We will also have it coming down from the ceiling on a 200mm arm - the arm is quite chunky which I like.

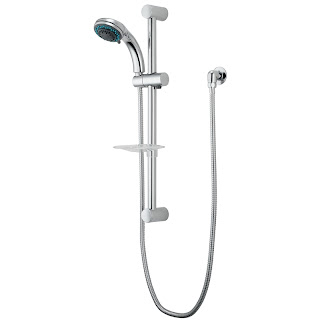
Suzy has always liked the adjustable hand-held showers, and we got the upgraded Olympic 5-function shower included in one of the upgrade packs we chose, so we decided to keep BOTH. We had a 'diverter' included ($86) so you can chose whether you want to use the overhead rain shower OR the wall mounted hand-held shower. We also chose to have the hand-held shower in the main bathroom too, as they are much nicer than the standard shower head seen in millions of homes and only a small upgrade cost.
'Pulsar' 5 function shower with adjustable arm.
We have to follow up with Porter Davis as to whether we have a 'mixer' AND a 'diverter' as that's the way our documents appear at the moment. However, the diverter appears to the job of both and it would look odd having a mixer that looks different.

Raymor Torino Mixer/Diverter - appears to be both a mixer and a diverter.

Caroma Acqua (yes, with the 'c') Mixer - a  very different style to all the other objects in the shower.

Bathroom Basins
At our previous house, we had lovely above bench basins with gooseneck taps, see below:


Porter Davis offer a very similar option in the Lifestyle range. However, we decided to go with a different sink that still is slightly above bench, but not completely, see below:
Porter Davis display home photo, showing Valentino 420 Stepped Vessel basin
This basin is an upgrade. We also chose the same tap as the above photo, which is the 'standard' option for the Lifestyle houses.

Toilets
We did also upgrade the toilets to the all-ceramic option. It's also slimline, but we weren't too fussy about toilet selection!

Prices:
FYI, here are some of the upgrade costs you can expect for bathroom upgrades (as at July 2013):

  • Tiber 250mm rain shower head AND 200mm ceiling arm - $501
  • Caroma Acqua wall mixer - $56
  • Raymor Torino wall mixer/diverter - $86
  • Valentino 420 Stepped Vessel Basin - $144 each (3 basins in the Drysdale = $432)
  • Toilets upgrade to Raymor Andorra - $34 each
  • Upgrade main bathroom to hand-held shower - $40


Saturday 6 July 2013

Electrical - A few things to think about

The electrical appointment is at Hopetoun Interiors, Port Melbourne. We managed to have our colour, electrical AND tiles appointment all booked on the same day. While it's a long day we feel it was really worth it - it saves having to travel out there several times and it means you can chose all your colour scheme while each choice is fresh in your mind.

A few things I learned from electrical was:

  1. Any outdoor lights *now* require sensors included. Porter Davis says this is a 'regulatory' requirement, but also say that after you move in you can do whatever you want! I think it's odd there would be a regulation forcing you to have a sensor for outdoor lighting, when the alternative is to have no lighting at all, doesn't make sense. The sensors they provide are huge, very ugly and cost more than $150 each (on top of the cost of the light). You can use one sensor for a number of lights, however.
    This is just the closest looking one I could find on Google. The way the cable comes out is similar, but PD's is grey and larger.

  2. The alternative to the above is to have them do the cabling and leave a junction box where you want to put your own light later, which is what we did for a each 'side' ('left' and 'right) on our house. Obviously getting a sparky in later will cost a bit more, but overall I think the cost will balance out by not using PD's overpriced sensors AND we will avoid using sensors that look like they belong in the original War of the Worlds.
  3. Under cupboard lights are $130 each, and look like below, though I believe there is another option. We chose to have two, one in the middle of the bench on each side of the rangehood.
    Under cupboard lighting for the kitchen. Approx $130 each.

  4. It is quite cost effective and easy to get two-way switches. For example, we got an outdoor light (well, junction box) put on the exterior wall of the house on the garage side. It will turn on with a switch from the rear garage door or from the laundry.
  5. You can request a four power points on one plate, rather than having two doubles next to each other. However, the quad-plate is quite beefy and I can't say I'd really appreciate seeing that on a wall. We did put one in the theater room and one in the living room, though, where TV units etc should conceal them.
  6. They won't let you put a powerpoint on the end of the island bench where the drawers are. They say there is insufficient space. When we built with Burbank this wasn't a problem, so not sure why Porter Davis differs.
  7. It would have cost a little over $1000 to have 4 point data cabling done. I can do this myself for much, much cheaper and I didn't need or want four points in any event. But I would suggest even an after-market sparky may be able to do this cheaper, if you lay down the ground work first (cut holes in plaster, have cables ready in roof etc. Remember that data cabling is not dangerous, so you can safely terminate it yourself if you cared to do so. I'm also wondering what the effects of the NBN rollout may be in terms of connecting my internet router to the NBN box, as Traralgon is *supposed* to have started rollout already, I think...
  8. You can have cabling for projectors or wall-mounted TVs done by Porter Davis but, again, it's not cost effective if you have some nouse to do it yourself. We are thinking of getting a projector in the theater room eventually, so we got them to put in a power point in the roof. However, I plan on running a draw string/cable and pre-drilling the noggins myself at the rough-in stage, which will make pulling through HDMI cables later an easy affair.
  9. The staff, while friendly, don't really make a whole heap of suggestions, so be sure to think about things you might want before you go in, and ask plenty of questions about it. Likewise, the staff know how to use the electrical schematic program ('Clipsec') but I doubt they have any understanding of the actual recommendations when it comes to data cabling etc (like keeping the data cables from running parallel to electrical cabling, where possible, unless shielded).

colour scheme for bathroom and ensuite

ok so Porter Davis have a thing called 'World of Style'. We loved it! There were so many to chose from. Essentially you can say "I want that Hamptons world of style" or the "French" or the "Manhattan" etc etc. We loved the Bordeaux France World of Style and have modeled our bathroom from the picture below. Our sink/tapware, toilet and shower and handles are the same as in this photo as well.


This is not our bathroom, its from the Waldorf (massive house).

The tiles/colour scheme for our bathroom and ensuite is this:
 https://mail-attachment.googleusercontent.com/attachment/u/0/?ui=2&ik=c96762c79c&view=att&th=13fb313564d873bf&attid=0.1&disp=inline&safe=1&zw&saduie=AG9B_P-Kcn1r1VR3E1c_W_O_WCMj&sadet=1373105734237&sads=mbOxuU4L9GkcPqqGkHj5j7J9nYc

The laminate colours for the cupboards etc are exactly the same as the world of style photo above. The leaf patten tile will be a feature tiled splash back. They will be 2 tiles high and 4 across. They are 20cm by 60cm. I really really like them. it will make the bathroom look a little prettier :)

We have chosed a different feature tile for the bathroom though, it does use the same wall and floor tiles though as above.

 https://mail-attachment.googleusercontent.com/attachment/u/0/?ui=2&ik=c96762c79c&view=att&th=13fb3795f7e23177&attid=0.1&disp=inline&safe=1&zw&saduie=AG9B_P-Kcn1r1VR3E1c_W_O_WCMj&sadet=1373105675982&sads=DiLBgzBRDZXGLuVQ0tSDPbxvJ4I&sadssc=1

Total Upgrades List

This is the part we found the most helpful on other people's blogs. The cost of upgrades. Writing this is NOT meant to be 'ooo look what we are getting' but more of a way to show others bulding the drysdale what can be upgraded and what they are looking to pay. We were pleasently surprised though, we came in a bit under budget, although we are still waiting for a confirmed cost on a few thigns, so that will most likely push us over. so here goes.....

  1. carpet pack: $7199. This is for Bolero floor boards and carpet. Tiles to wet areas are included in the base price
  2. Function fancy pack: $999. this included hand held shower to ensuite, laminate extended benchtop to laundry, laminate laundry cabinet with everhard white insert trough, fly screen, locks to all openable windows, internal access to garage. This was well worth it!!
  3. rear alfresco $5596
  4. automatic roller door to garage $670
  5. extended window in theatre room (double the height) $171
  6. flysceen sliding doors to both the sliding door from rumpus and living areas $688
  7. 3 internal doors, to theatre, ensuite and rumpus room $569
  8. 1/2 linen and 1/2 broom cupboard as extra in laundry $789
  9. overhead cupboards in kicthen $1155
  10. laminate in lieu of melamine in pantry $752
  11. pot drawers, 2 either side of oven $377
  12. drawers to vanity in ensuite $252
  13. ceiling dumper to ensuite, 250mm $389, divertor for tap $86
  14. two external garden taps $252
  15. capped hot water point to alfresco $125
  16. Capped waste point to alfresco $212
  17. Capped cold point in alfresco $125
  18. 900x1200 shower in ensuite in lieu of 900x900 $226
  19. upgrade to 4.3* brivis zoned heating, 3 zones. $2600
  20. essa stone to island bench in kitchen and opposite bench $2878
  21. upgarded handles throughout the house, @ $7 per handle
  22. deadbolt lock to front door, with a much nicer handle etc $186
  23. upgrade to nice doors, 4 panel $484 for all internal doors
  24. upgarded toilet $34
  25. upgraded to hand held shower and mixer in bathroom $100ish
  26. upgarded vanity basin $144 each. we got three
  27. upgraded underlay, to grade 3 $306 throughout the house. 
  28. upgraded tiles and feature splashbacks, came in at just under $1000. The main costs here were the feature splash backs in bathroom and ensuite, as well as tiles in the pantry (as a splash back) we upgraded to bigger floor tiles for wet areas and it was really cheap, only about $100 for the whole wet areas!
  29. we also spent $1600 on eletrical, $43 per extra power point. $100 for external power points, $170 for a wired in door bell, $140 each for under cupboard lights in the kicthen, $70 for TV and phone points. 
 phew! all done!

looking at all those upgrades it comes to mind if we should have done it all!!! but i dont regret it. Its still all within budget as Porter Davis was so much cheaper than other local builders!.

although we are still awaiting prices for soft close pot drawers and cupboards, upgraded oven and rangehood and cooktop, as well as a dishwasher. So these prices will come soon, hopefully!

Tender

As we are building in the East we had our tender appointment at Narre Warren with Sue. She was lovely and very helpful. At the tender we needed to make any structrual changes, as after the tender it was too late. I think they start ordering things and getting things sorted from this point.

The structrual changes we made were very minor. We added a door from the master bedroom into the ensuite... who  wouldn't want a door here, noise, light, smells would all come through. We also added a door to the theatre room. As well as a door from the main living are to the 'kids' zone.

We also filled in the void between the study and the entrance hall. That way it is a usable wall now.

Tender took quite a while. We were there for about 4 hours, which included a 45 min break whilst the did the costings etc.

We also added an upgraded central heater, though ill go into the upgrades and costs in a later blog.

From the tender there is the colour/electrical/tiles appointment, then the final contract then one last trip to Melb for a final sign off on diagrams.

all up there are 4 trips to Porter Davis after you have signed at the display house. Just bear that in mind, the trip for us for the colours etc appointment was a 6 hour return trip, and the other ones are about a 5 hour return trip. Make sure you have enough time to make these appointments, as they have to happen, you get no choice. It is worth it though, you can find all the mistakes before building, which is a good thing :)

Friday 5 July 2013

First things first, Drysdale 30

Welcome to our blog! We decided to create this blog as we found looking at others people's blogs very useful when chosing things about our house. So we hope this helps out other people too!

We had a lot of help from:
http://fromthegroundupbuild.blogspot.com.au/p/about-house.html

We have chosen to build with Porter Davis as we loved their designs! and Price! We initially were VERY keen to build the Foxley, however after a staff member suggested the  Drysdale we fell in love with it! the layout will suit our needs now, as well as when a family begins to grow.

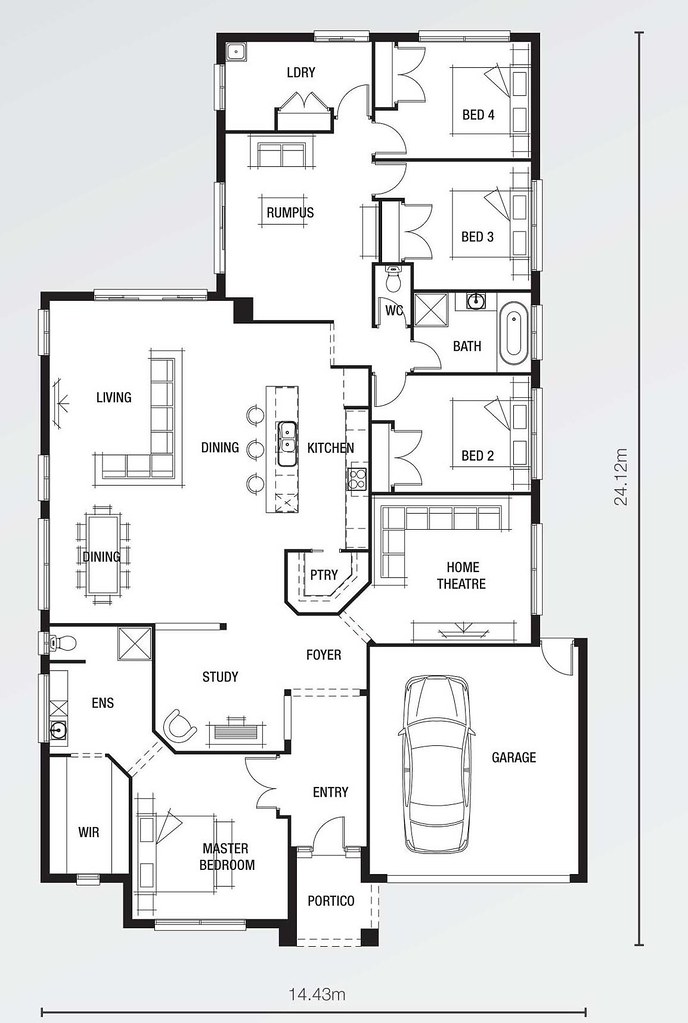
Below is the plan for the Drysdale 30, you can also check it out from the Porter Davis website:
http://porterdavishomes.com.au/homes/lifestyle/drysdale


The House